Tackling attic insulation as a do-it-yourself project can seem like a cost-effective way to improve your home’s energy efficiency. However, there are several attic insulation DIY mistakes to avoid that can end up costing you more in the long run. Improper installation, overlooking safety precautions, and using the wrong materials are just a few of the common pitfalls that can undermine your efforts. Understanding these errors before you begin can help ensure your project delivers the comfort and savings you expect.
If you’re interested in how home improvements like insulation interact with modern roofing technologies, you may also want to read about solar roofing market trends for insights on integrating energy-saving solutions.

Common Errors When Installing Attic Insulation Yourself
Many homeowners underestimate the complexity of insulating an attic. While the process may appear straightforward, there are several frequent errors that can reduce the effectiveness of your insulation and even cause damage to your home. Recognizing these attic insulation DIY mistakes to avoid is crucial for a successful project.
- Inadequate Preparation: Failing to inspect for roof leaks, mold, or pest infestations before starting can trap problems beneath new insulation.
- Incorrect R-Value Selection: Using insulation with the wrong R-value for your climate zone leads to poor thermal performance.
- Blocking Ventilation: Covering soffit vents or blocking airflow can cause moisture buildup and reduce attic ventilation.
- Poor Coverage: Leaving gaps, compressing insulation, or not reaching into corners allows heat to escape and cold air to enter.
- Ignoring Safety: Not wearing protective gear or stepping off joists can result in injuries or exposure to hazardous materials.

Choosing the Right Insulation Materials and Tools
Selecting the correct materials is a foundational step in preventing attic insulation DIY mistakes to avoid. The type of insulation—whether fiberglass batts, blown-in cellulose, or spray foam—should match your attic’s structure and your region’s climate requirements.
- Fiberglass Batts: Easy to install but must be cut precisely to fit between joists without gaps.
- Blown-In Cellulose: Good for filling irregular spaces but requires specialized equipment and even distribution.
- Spray Foam: Offers high R-value and air sealing but is best left to professionals due to application complexity and safety concerns.
Using the right tools—such as a utility knife, straightedge, staple gun, and protective equipment—can make the job safer and more effective. Always follow manufacturer instructions for both materials and tools to avoid common pitfalls.
Ventilation and Air Sealing: Overlooked Essentials
Proper attic ventilation and air sealing are often neglected in DIY insulation projects. Failing to address these aspects can lead to moisture problems, mold growth, and reduced energy efficiency. Before installing insulation, seal all air leaks around pipes, wiring, and attic hatches with caulk or expanding foam.
Make sure not to block soffit or ridge vents. Maintaining clear airflow is essential to prevent condensation and keep your attic dry. Consider installing baffles to keep insulation from obstructing ventilation paths.
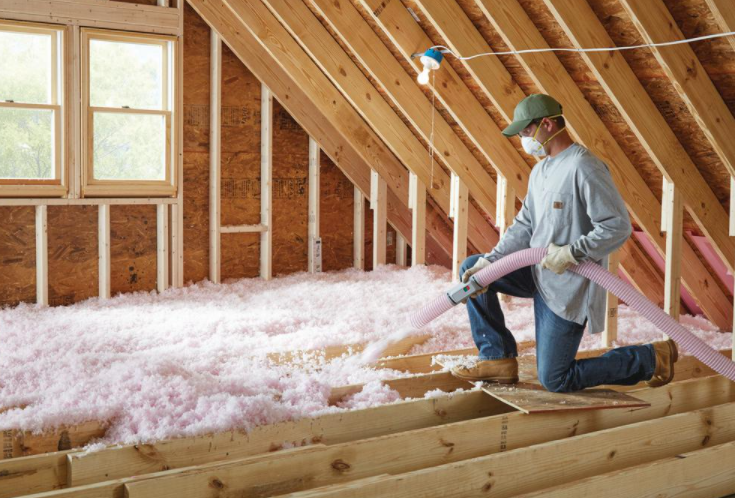
Safety Precautions for DIY Attic Insulation
Safety should never be an afterthought. Attics can be hazardous due to limited space, exposed nails, and the risk of stepping through the ceiling. Always wear gloves, goggles, a dust mask, and long sleeves to protect against insulation fibers and debris. Use a sturdy work light and walk only on joists or boards to avoid accidents.
If you encounter old insulation that may contain asbestos or signs of rodent infestation, consult a professional before proceeding. Never attempt electrical work unless you are qualified, and always turn off power to the attic before starting.
Ensuring Complete and Even Coverage
One of the most frequent attic insulation DIY mistakes to avoid is failing to achieve consistent coverage throughout the attic. Gaps, compressed material, and missed corners can significantly reduce the effectiveness of your insulation.
- Check for even depth across the entire attic floor.
- Fill all accessible areas, including tight corners and spaces behind chimneys or ductwork.
- Do not compress insulation, as this lowers its R-value and thermal performance.
- Inspect your work with a flashlight to spot thin spots or missed sections.
Taking the time to double-check your installation can make a noticeable difference in comfort and energy savings.
When to Call a Professional
While many homeowners can handle basic insulation upgrades, some situations call for expert help. If your attic has complex framing, existing moisture or mold issues, or you’re considering spray foam, hiring a professional is the safest choice. Professionals can also ensure compliance with local building codes and help you maximize energy rebates or incentives.
For those interested in further energy-saving upgrades, exploring innovations in solar roofing can complement your insulation project and boost your home’s efficiency.
Frequently Asked Questions
What is the best type of insulation for attics?
The ideal insulation depends on your attic’s layout and your climate zone. Fiberglass batts are popular for open joist attics, while blown-in cellulose works well for filling irregular spaces. Spray foam offers high performance but is typically installed by professionals.
How much insulation should I add to my attic?
The recommended insulation level varies by region. In colder climates, an R-value of R-49 to R-60 is often suggested, while milder areas may require less. Check local building codes and use the Department of Energy’s guidelines for your area.
Can I install new insulation over old insulation?
In most cases, you can add new insulation over existing material as long as the old insulation is dry and free of mold or pests. Remove any wet, compressed, or contaminated insulation before adding more.