As a homeowner, deciding to install roof shingles on your house is a big step. The process involves several stages and requires attention to detail and safety. Whether youre a seasoned DIYer or a curious newbie, understanding how to install roof shingles will help you create a sturdy and aesthetically pleasing roof. The proper method can save you time, effort, and potential headaches in the future.

Understanding Roofing Shingles
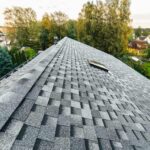
Roof shingles are flat, typically rectangular elements that cover the roof. They are laid in overlapping fashion and play a significant role in protecting your home from the elements. Various materials can make up roofing shingles, including asphalt, wood, metal, slate, and others. Each material has its advantages, durability, and cost factors. Before diving into installation, its crucial to know your options and choose what suits your needs best.
Why Choose Shingles?
Shingles are favored for their versatility and relatively affordable price. They offer a visually appealing look and are available in various colors and styles. Moreover, shingles are known for their efficiency in shedding water and withstanding harsh weather conditions.
Preparing for the Installation
Gathering the Right Tools and Materials
To start the process, youll first need to gather essential tools such as a tape measure, roofing nails, a hammer, a ladder, and personal safety equipment. A nail gun could also be a useful alternative to expedite the process, especially if you’re covering a large area.
Environmental Considerations
Consider the season and weather forecast before proceeding with the installation. Favorable weather conditions are essential, as roofing on days with strong winds, rain, or excessive heat can compromise both personal safety and the quality of the work.
Steps to Install Roof Shingles
Start with Removing Old Shingles
Removing the old shingles is a crucial step if youre replacing an existing roof. Using a shingle ripper or fork, carefully remove the old roofing material down to the roof deck. This process will ensure you have a clean and prepared surface for the new installation.
Inspecting and Repairing the Roof Deck
Once the old shingles are gone, inspect the roof deck for any damage like rot or loose nails. Repair any imperfections to ensure the deck remains structurally sound and ready for new installations.
Install an Underlayment
The underlayment provides an additional water-resistant barrier beneath your shingles. Roll out the material across the roof, making sure to overlap sheets for comprehensive coverage.
Check the cost of installation for a better budget plan.
Setting Up the Drip Edge
A drip edge is a metal flashing installed at the edges of your roof to direct water away from the fascia boards. This installation protects the underlayment and roofing shingles, enhancing the overall water resistance of your roof.
Applying the Starter Shingles: Start at the bottom corner of the roof, laying the starter shingles along the roofs edge. The starter shingles ensure that no water infiltrates between the roofs edge and the first row of shingles.
Laying Down the Asphalt Shingles
Begin installing the first shingle in a corner. Follow up by layering the shingles, overlapping them thoroughly to optimize water shedding and prevent leaks.
Nailing Techniques
While laying shingles, use the correct nailing technique, involving four to six nails depending on local code requirements. Drive nails straight and flush against the shingles to prevent leaks and uplift.
Final Touches and Finishing
Adding Ridge Shingles
Once main shingles have been installed across the roof surface, lay ridge shingles across the roof peak. These special shingles cover gaps between shingles of different slopes.
Sealing the Roof
Inspect the roof for any loose shingles or imperfections. Use roofing cement to fix any potential leaks for added security.
Maintenance Tips
Regular inspections and maintenance can drastically extend the lifespan of your roof. Check for any missing or damaged shingles after storms or heavy winds.
Pros and Cons of DIY Roof Installation
The Advantages
Doing it yourself can save money and provide personal satisfaction. Plus, youll have complete control over timing and material selection.
Potential Downsides
However, a professional often yields much faster and cleaner results, especially on intricate roofing systems.
Deciding on Professional Assistance
If the process seems overwhelming, hiring a roofing expert might be a tremendous investment. They bring expertise, tools, and efficiency to the project. Learn how to choose the right construction company for your needs.
Conclusion
Embarking on a roofing project requires thoughtful planning and execution. With the right tools, preparation, and knowledge, you can install an approved, terrifically shingled roof that withstands the test of time. Remember, theres no substitute for quality work when it comes to protecting your home. For more information on roofing materials, visit this external link.

FAQs
Whats the average lifespan of roof shingles?
The lifespan can vary widely based on material and conditions but typically ranges from 20 to 50 years.
How much does roof shingle installation cost?
Cost can vary dramatically, but on average, installation could cost between $5,000 to $10,000 for an average-sized roof.
Can I install roof shingles over existing shingles?
While possible in some cases, it’s not recommended as it could lead to uneven surfaces and reduce the durability of the new shingles.
This article contains affiliate links. We may earn a commission at no extra cost to you.