Adding or upgrading roof insulation is one of the most effective ways to improve your home’s energy efficiency and comfort. Properly installed insulation helps regulate indoor temperatures, reduces heating and cooling costs, and can even extend the lifespan of your roof. Whether you’re tackling this project yourself or simply want to understand the process before hiring a professional, this guide will walk you through the essential steps, materials, and best practices for a successful installation.
Before diving into the details, it’s important to note that maintaining and inspecting your attic insulation is just as crucial as installing it correctly. For tips on keeping your insulation in top shape, check out our guide on attic insulation seasonal maintenance.

Understanding the Importance of Proper Roof Insulation
Insulating your roof is more than just a way to keep your home warm in winter and cool in summer. It plays a vital role in minimizing energy loss, preventing moisture buildup, and protecting your property from extreme weather. When insulation is installed the right way, it can also help reduce noise from outside and create a more consistent indoor environment throughout the year.
Skipping steps or using the wrong materials can lead to common issues such as air leaks, mold growth, or even damage to your roof structure. That’s why following a proven process and using quality materials is essential for long-term performance.
Choosing the Right Materials for Your Project
There are several types of insulation suitable for roofs, each with its own advantages. The most common options include:
- Fiberglass batts or rolls: Affordable, easy to handle, and widely available. Best for DIY projects in attics with standard joist spacing.
- Blown-in cellulose or fiberglass: Ideal for filling irregular spaces or adding insulation over existing layers. Requires special equipment for installation.
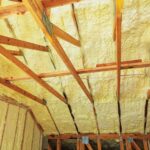
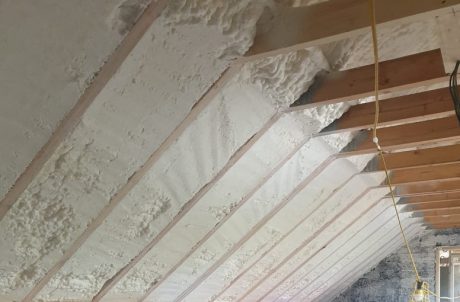
- Spray foam: Provides excellent air sealing and high R-value per inch. Best applied by professionals due to the chemicals and equipment involved.
- Rigid foam boards: Useful for cathedral ceilings or areas where space is limited. Offers high insulation value and moisture resistance.
When selecting insulation, consider factors like R-value (thermal resistance), moisture resistance, fire safety, and local climate requirements. Always check your region’s building codes for minimum insulation standards.

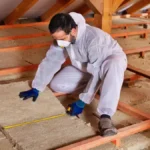
Preparing for a Successful Installation
Preparation is key to achieving the best results. Start by gathering all necessary tools and materials, which may include:
- Measuring tape
- Utility knife or insulation saw
- Protective gear (gloves, goggles, mask, long sleeves)
- Staple gun (for batts or rolls)
- Insulation supports or wires
- Blower machine (for loose-fill insulation)
- Sealant or expanding foam (to close gaps and cracks)
Next, inspect the attic or roof space for any signs of leaks, mold, or structural damage. Address these issues before proceeding. Remove any old or damaged insulation, and make sure the area is clean and dry. It’s also important to seal any air leaks around vents, pipes, and electrical penetrations to maximize the effectiveness of your new insulation.
Step-by-Step Guide: Installing Roof Insulation Effectively
The process for adding insulation will vary depending on the type you choose, but the following steps outline the general approach for most residential projects:
- Measure the Area: Calculate the square footage of the space to determine how much insulation you’ll need. Account for joist spacing and any obstacles.
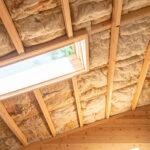
- Install Ventilation Baffles: Place baffles between rafters at the eaves to ensure proper airflow from soffit vents. This prevents moisture buildup and maintains attic ventilation.
-
Lay or Blow in Insulation:
- For batts or rolls: Fit the insulation snugly between joists, avoiding compression. If a second layer is needed, lay it perpendicular to the first to cover gaps.
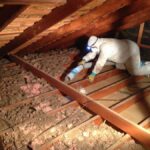
- For loose-fill: Use a blower to distribute insulation evenly across the attic floor, reaching the recommended depth for your climate zone.
- For spray foam: Apply according to manufacturer instructions, ensuring even coverage and proper thickness.
- Seal Gaps and Edges: Use caulk or expanding foam to seal any remaining gaps around pipes, wiring, or attic hatches.
- Check for Even Coverage: Inspect the area to ensure there are no low spots or compressed sections, which can reduce effectiveness.
- Replace or Add Vapor Barrier: In some climates, a vapor barrier may be required to prevent moisture from entering the insulation. Install as needed, following local codes.
For more details on keeping your insulation in top condition after installation, see our tips on how to maintain attic insulation.
Common Mistakes to Avoid During Installation
Even with the best materials, improper installation can undermine your efforts. Here are some frequent errors to watch out for:
- Blocking ventilation: Insulation should never cover soffit vents or block airflow, as this can cause moisture problems and reduce roof life.
- Compressing insulation: Squeezing batts or rolls into tight spaces reduces their R-value and effectiveness.
- Leaving gaps: Small spaces between insulation pieces can lead to significant energy loss.
- Ignoring air leaks: Failing to seal cracks and penetrations allows conditioned air to escape and outside air to enter.
- Using the wrong R-value: Always match the insulation type and thickness to your climate zone and building code requirements.
If you notice problems after installation, such as uneven temperatures or increased energy bills, it may be time to review your work or consult a professional. For help identifying issues, our article on attic insulation common problems can be a valuable resource.
Aftercare and Ongoing Maintenance
Once your insulation is in place, ongoing care is essential for long-term performance. Periodically inspect the attic for signs of moisture, pests, or settling insulation. Address any roof leaks promptly, and ensure that vents remain clear of obstructions.
If you notice drafts or temperature fluctuations, it may be time to check your insulation coverage. For a step-by-step approach to evaluating your attic, see our guide on how to inspect attic insulation. If your insulation is old or damaged, you might also want to review the attic insulation replacement signs to determine if an upgrade is needed.
Frequently Asked Questions
What R-value should I use for roof insulation?
The recommended R-value depends on your climate zone and local building codes. In colder regions, higher R-values (R-38 to R-60) are typically required, while milder climates may only need R-30 to R-38. Always check with your local authorities for specific requirements.
Can I install new insulation over old insulation?
Yes, you can add new insulation over existing material as long as the old insulation is dry, free of mold, and not compressed. Remove any damaged or wet insulation before adding new layers to avoid trapping moisture.
Is it better to use batts, blown-in, or spray foam for my attic?
The best type depends on your attic’s layout, your budget, and your goals. Batts are easy for DIY projects, blown-in works well for covering irregular spaces, and spray foam offers superior air sealing but usually requires professional installation. Consider your needs and consult with an expert if unsure.
How often should I check my attic insulation?
It’s a good idea to inspect your insulation at least once a year, especially after severe weather or if you notice changes in your home’s comfort or energy bills. Regular checks help catch issues early and maintain optimal performance.