Are you looking for ways to improve your home’s energy efficiency while extending the life of your roof? Learning how to apply reflective roof coating can be a game-changer. In this guide, we will explore the step-by-step process of applying a reflective coating to your roof, which not only helps in keeping your home cooler but also provides additional protection to your roofing material.

What is Reflective Roof Coating?
Reflective roof coating is a type of fluid-applied roofing membrane that reflects sunlight and reduces heat absorption. By lowering the roof’s temperature, it helps in decreasing the cooling costs of your home. Moreover, these coatings can extend the life of your roof by minimizing the damage caused by UV rays and thermal cycling.
Benefits of Using Reflective Roof Coating
Energy Efficiency
One of the main advantages of applying a reflective roof coating is its ability to enhance your home’s energy efficiency. By reflecting sunlight, it significantly lowers the roof’s temperature, which means your air conditioning system doesn’t have to work as hard. This can lead to substantial savings on your energy bills.
Prolongs Roof Lifespan
Reflective coatings can extend the life of your roof by protecting it from harmful UV rays and reducing thermal shock caused by fluctuating temperatures. This means fewer repairs and increased durability over time.
Environmental Impact
By reducing energy consumption, reflective roof coatings contribute to lower greenhouse gas emissions. This makes them an environmentally friendly option for homeowners looking to minimize their carbon footprint.
Preparation Before Applying Reflective Roof Coating
Inspect Your Roof
Before applying any coating, it’s crucial to thoroughly inspect your roof for any damages or issues that need fixing. Look for cracks, leaks, or any signs of wear and tear. Addressing these problems beforehand ensures a smooth application process and maximizes the coating’s effectiveness. For more detailed guidance, you can visit our article on roof inspection.
Clean the Roof Surface
The next step is to clean the roof surface. Dirt, debris, and existing coatings can hinder the adherence of the new coating. Use a pressure washer or a hose with a strong spray to remove any loose debris. For stubborn stains or mold, consider using specialized cleaning solutions. You may find our cleaning tips helpful.
Repair Any Damages
After cleaning, repair any visible damages such as cracks or leaks. You can use roof cement or patches for minor repairs. Ensure that all repairs are thoroughly dried before proceeding with the coating application.
Choosing the Right Reflective Roof Coating
Types of Coatings
Various types of reflective roof coatings are available on the market. Some common types include acrylic, silicone, and polyurethane coatings. Each type has its benefits and is suitable for different types of roofing materials. Consider consulting a professional or conducting thorough research to determine the best option for your roof.
Factors to Consider
When choosing a coating, consider factors such as your roof’s material, local climate, and budget. Some coatings are better suited for specific climates, while others offer more durability or better reflective properties.
Step-by-Step Guide on How to Apply Reflective Roof Coating
Step 1: Gather Your Materials
Before you begin, ensure you have all the necessary materials, including the coating, rollers or brushes, a mixing stick, and safety gear such as gloves and goggles.
Step 2: Read the Instructions
Each product may have specific application instructions. It’s essential to read and follow these instructions carefully to ensure proper application and maximize the coating’s effectiveness.
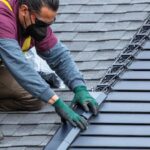
Step 3: Apply the Coating
Start by applying a thin, even layer of the coating using a roller or brush. Work in small sections, ensuring complete coverage. Allow each layer to dry as per the manufacturer’s instructions before applying additional coats if needed.
Step 4: Inspect the Finished Coating
Once the coating has dried, inspect the roof to ensure there are no missed spots or areas with uneven coverage. Touch up any areas that require additional coating.
Maintenance Tips for Reflective Roof Coating
Regular Inspections
Conduct regular inspections of your reflective roof coating to identify any issues early on. Look for signs of wear, peeling, or damage, and address them promptly.
Cleaning and Care
Regular cleaning helps maintain the coating’s reflective properties and prolongs its lifespan. Avoid using harsh chemicals or abrasive tools that could damage the coating. For more tips, check out our article on clearing roof drains.
Common Mistakes to Avoid
Applying on a Wet Surface
Always ensure that the roof surface is completely dry before applying the coating. Moisture can prevent the coating from adhering properly and affect its performance.
Ignoring Manufacturer’s Guidelines
Each coating product may have specific requirements and guidelines. Ignoring these can lead to improper application and reduced effectiveness.
Cost Considerations
The cost of applying a reflective roof coating can vary based on factors such as the size of your roof, the type of coating chosen, and whether you hire a professional or undertake the project yourself. While DIY application can be cost-effective, professional installation ensures expertise and quality results.
FAQ Section
How long does reflective roof coating last?
Reflective roof coatings can last between 5 to 10 years, depending on the type of coating used and maintenance practices.
Can I apply reflective roof coating myself?
Yes, with the right tools and instructions, homeowners can apply reflective roof coatings themselves. However, hiring a professional ensures proper application and adherence to guidelines.
Is reflective roof coating suitable for all roof types?
Most roof types can benefit from reflective coatings, but it’s essential to choose a product compatible with your specific roofing material.

Conclusion
Applying a reflective roof coating is a valuable investment for homeowners looking to enhance energy efficiency, extend their roof’s lifespan, and reduce environmental impact. By following the steps outlined in this guide, you can ensure a successful application and enjoy the benefits of a cooler, more durable roof. For more tips on maintaining your roof, you can visit This Old House.
This article contains affiliate links. We may earn a commission at no extra cost to you.